Showing posts with label Stampin' Up. Show all posts

Friday, 21 October 2016

Star of Light at Coffee and Cards


Although I know I should, I haven't yet had opportunity to buy from the Autumn/Winter catalogue so when Susan of Craftyduckydoodah suggested we use Star of Light, I jumped at the chance. In fact we were lucky enough to use this set two weeks running and make completely different cards.


The first week we used Sweet Sugarplum and Very Vanilla, possibly not really thought of as Christmas colours, but the results were gorgeous.


As usual I added a little bling - well you have to for Christmas! The smaller star was die cut from Dazzling Diamonds Glimmer paper. A Wink of Stella in clear alongside a few jewels completed the look.

As usual we decorated the inside of the card and the envelope. I think it gives a "finished" look each time. This set is on one of my wish lists - yes, I have more than one! List one is for must haves - the sets I just can't live without. Sets and/or bundles that I know I will go to for numerous occasions, regarless of whether they get discontinued. Star of Light (and Jar of Love) fall into this category. The next list is the wanted list - sets that I know will be used but may not have such versatility.

The swirly stars are perfect for backgrounds throughout the year. I've been eying them up for the next Harry Potter card I make for my youngest daughter but more about that later.


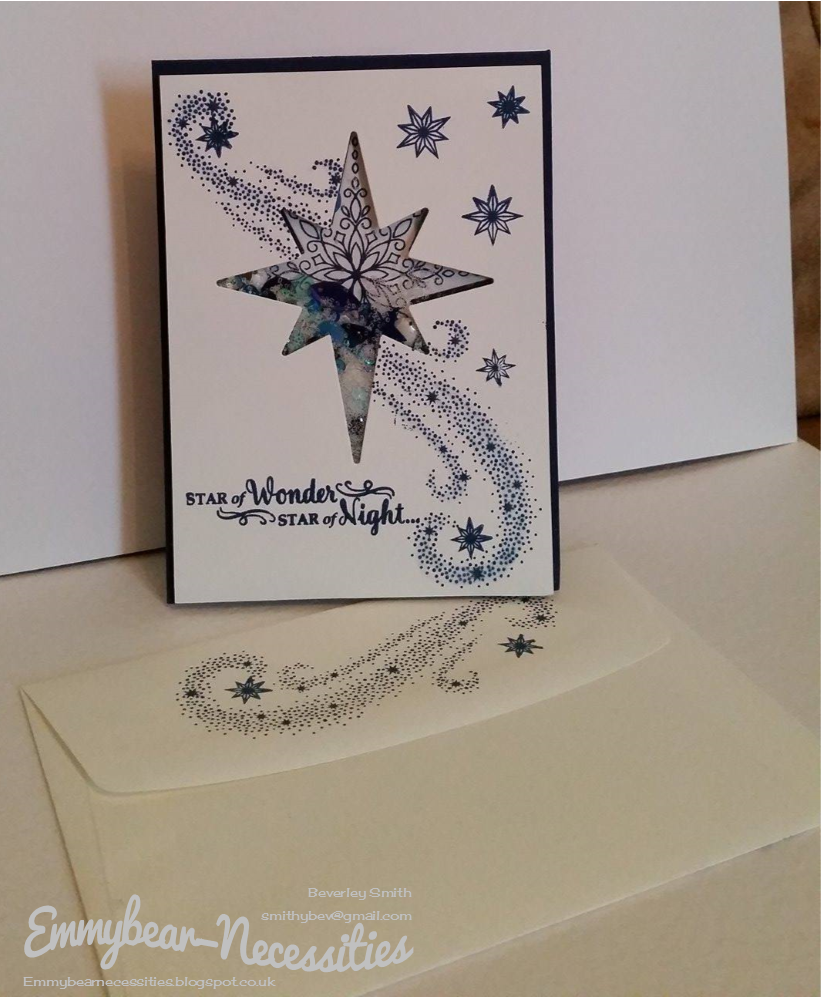
And so onto week two. This time we made a shaker card in Night of Navy and Whisper White. They look as if they are quite complicated to make but really are so easy....


This time the star was cut using the plain die. The cutout was stamped and very carefully stuck onto the base card so it fitted the aperture. It's at this stage it helps to remember the acetate to hold the sequins in. It can be either glued or taped in place as long as there are no gaps for the sequins to escape, Stampin' Up now make foam adhesive strips which are a great depth and will mould around any shape.


Close up


Once again Wink of Stella added bling, this time to the swirls. Sorry it doesn't show up so well on the page. To make the shaker more interesting the star was stamped inside before adding sequins.

Is this where I admit there are actually more of the little stars on this card than I had intended? I'd just inked up the slightly larger of the 2 small stars when it fell put of my hand onto the paper, ink side down. Bit of an oops moment however by adding two more - one small and another larger, I think I've got away with it. And who knows, if I hadn't 'fessed up, no-one would be any the wiser.


Friday, 14 October 2016

Pleats, Folds and More Pleats

Hello, this last week week I've been looking at ways to use DSP in my cards. I came across the idea of pleating it to create different effects and have to say, I really like the results.

For my first one I used 2 sheets of 6"x6" paper as I didn't have any 12" double sided. This really caused me headache trying to get the join hidden and I honestly wouldn't recommend it unless you have paper that you just can't not use.


As the paper has such a busy pattern I tried to keep the decoration to a minimal, with just a sentiment and one butterfly. I love butterflies, so the end result, for me, justifies the headache caused matching the paper. The DSP used is the sadly retired Pretty Petals and the butterfly was stamped from Papillon Potpourri and punched with the matching Elegant Butterfly punch.


The next card I made was far easier courtesy of Susan  from Craftyduckydoodah who on hearing my plight kindly sorted through her 12"x12" DSP stock and brought some sheets for me to use when I attended her Coffee and Card group.


This time, the pleats weren't so close so more of the 2nd side could be seen. With the words facing, I thought it would be nice to add balloons.I didn't have any wide ribbon in either white or Night of Navy so used narrow navy on a strip of Whisper White cardstock. Balloons were punched from Whisper White, Night of Navy and the DSP.


So flushed with success I thought I'd try a collar fold for the third card. I combined  a sheet from Pretty Petals with my favourite bundle, Jar of Love to create this one. I think it might even be my favourite card of this group.


At the time of making this, a friend let me know that her son had been involved in an accident and was undergoing emergency surgery, hence the sentiment. Thankfully, he's making a good recovery and due to the skill of the maxillofacial surgeon will have minimal scarring.


And finally, getting right into folding, I chose to make a double pleated card. This one used Affectionately Yours DSP. I also used a Swirly Scribbles die and the tiny flowers from the Jar of Love bundle - could it have really been anything else!


I really hope you like this selection. Next on my to do list is to try a different for me ink technique. I'm going to attempt to recreate the Northern Lights and will report back once it's completed. I expect to have very inky fingers.

Friday, 7 October 2016

Bella and Friends

The other day I made a card for a friends niece for her first birthday. I used a fabulous stamp set set by Penny Black called Zoophabet and stamped the tots name. Anyway, I really enjoyed doing the water colouring so that led me to dig out Bella and Friends. The dog is just like my daughter's dog, Dexter.


I love the colour Pool Party so decided that would be my starting point. Ages ago I bought some sheets of thin balsa wood and felt that would complement the blue perfectly, alongside a little silver for a bit of zing. I used blender pens with Write Markers to colour the image in. A little Kraft Rope trim unravelled and wrapped around the top just finished it off.


Tuesday, 4 October 2016

Falling for.... Fall

A Coffee and Cards treat again. Now there is a chill in the air early morning and night time, thoughts turn to winter woollies, snuggling up in front of the fire, hot cocoa and crumpets, well mine do anyway. I love this time of year for the autumn leaves, the colours are so rich and combined looked stunning so I was delighted when it was suggested we made an Autumnal card.

Susan gave us a couple of options of design using the Vintage Leaves stamp set. She also incorporated the most gorgeous little Into the Woods embellishments and we were each able to choose the one we wanted. In fact I love them so much, they have been ordered for me today.
Into the Woods Elements by Stampin' Up!
Rather than me explain how we made the cards, I'll post the link to Susans blog so you can see for yourself. For me, the main difference is that I used the embossed rather than debossed side. While some demonstrators prefer you to slavishly copy, we are encouraged to go "off piste" and alter the design to suit which follows the Stampin' Up ethos "Inspire, Create, Share"

https://craftyduckydoodah.blogspot.co.uk/2016/10/stampin-up-vintage-leaves-version-1.html


Monday, 22 August 2016

She's got the key of the door, never been 21 before....

While I have started papercrafting for Christmas rather than make cards there are some occasions that you just want to make a card for.


Today it's my youngest daughter, Sarah's 21st birthday; I know, I don't look old enough! Anyway, not being a girly girl I decided to make a card in shades of purple and turquoise - not an obvious choice but her favourite colour she assures me is turquoise and being an Emo, purple had to be included. The stamp set used was Balloon Celebration and I used the Balloon Bouquet co-ordinating punch. My upline Susan, aka Mama Duck, kindly cut out the number 21 using the large number framelit dies - I really must soon get my own set soon as I can see so many uses for them.


I couldn't decide at first how to tie the purple and turquoise together for the background; then I remembered I had Gorgeous Grunge. I used the larger ink splat in turquoise and the smaller splat in purple. With both colours I stamped onto a scrap of paper first before committing to the background so I ended up with a paler version. The eagle eyed amongst you will notice the lines from the edge the stamps; I actually like the addition of them for this card as it adds to the effect although normally, I'd wipe away excess ink before stamping.


The balloons were given a lick of Wink of Stella before being heat embossed with clear powder.


Monday, 15 August 2016

Time Flies...

Well time certainly seems to be flying here in Colne, this year is wizzing by. Once again I decided to concentrate on small gifts for Christmas; this time an easel calendar with post it pad, they say variety is the spice of life. I also felt that it was time that men got a look in, most of my crafty makes are very much designed for women. Like lots of crafters, I tend to find cards and gifts more difficult to design with men in mind.

 I keep seeing the Hardwood background stamp cut and turned into fencing but thought it would be nice to use it as is. This stamp reminded me of the hardwood interior of a Freeman 22 mark 1 cabin cruiser I'm the co-owner of still at the moment so it didn't take much of a leap to use the Going Global stamp set and create a slightly nautical theme. I have a die in the shape of an anchor that completed the look. The colours chosen add to the theme.


I used Marina Mist as the base card and layered with the Crumb Cake stamped with the Hardwood background. Dapper Denim added a splash as my accent colour. I also used Linen Thread wrapped around the Crumb Cake several times to give a little texture. The anchor was coloured in grey and then I used glossy accents over it. It came out exactly as I had planned, looking quite grungy, but that was more by luck than design.

Close up
All that I need to do now is add the Post It notes when they arrive.


Sunday, 14 August 2016

Busy Bee....

Hi everyone, while I'm not ready to start making more Xmas cards yet, I thought I'd start preparing for Xmas in other ways. The other week I decided to order calendar tabs, post it notes and shopping list pads with a view to making some desk top sets. I only hope the village has an Xmas fair or everybody I know will be getting a set from Santa. I had seen a lovely calendar on Pinterest, created by Lorri Heiling so decided to use that as my inspiration. The Post It note and mini pen holder was inspired by Dee Slater, her tutorial is on You Tube so thank you to both ladies.

I've mentioned before my daughter is called A-beee by her friends and partner so what better bundle to use than Shooting Stars. I used the beehive and both sized bees. While I could create a tutorial I feel the 2 ladies mentioned above do a far better job than I ever could so I have linked to Lorri's blog and Dee's You Tube video. I hope you feel I've done them justice with my creations. So the colours used are -


I think they look lovely and fresh together.


Tuesday, 9 August 2016

Oh Baby...


Just a very quick and simple card for today using the Something For Baby stamp set. I took my inspiration from the current SU catalogue (image below) since this particular stamp works best with Write Markers.

Click here to shop
 I created the background by first stamping on a scrap of paper to remove excess ink before stamping on the white card.

Once again, I've stamped on the envelope and also inside on the insert for a cohesive look.


Thursday, 4 August 2016

Not quite Xmas in July...

I've been lucky enough to have a sneaky peak at the new Autumn/Winter Catalogue and I have to admit there are some gorgeous new stamps coming out; some even have dies or punches to co-ordinate. With so many to choose from I'm trying to work out my "can't live without list" and at the moment it's quite a list. The dilemma I have is that as a new demonstrator, I'm still trying to build up my core stock so I want the choices I make really work for me.

In the meantime as everyone is showing their Xmas makes, I thought I'd make a card using the Wondrous Wreath stamps and Wonderful Wreath die set. Luckily these stamps are extremely versatile, so if I wanted to, I can use them for other occasions as well.

First of all I decided on my colour scheme. I have a friend in mind to send this to during the holiday season who likes all her decor to match - and that includes cards when possible!
So for Chantelle, I've chosen Pool Party and Bermuda Bay with highlights of Crumb Cake.


This uses up to 3 stamps to create the wreath, so first of all, I stamped the background leaves in Pool Party, then used Bermuda Bay to give a little depth. I finally did the berries in Crumb Cake and brushed them with clear Wink of Stella to add a little shimmer.


Layering the stamps is so easy as each one has a small tab to ensure correct placement, hence the small mark on the card. As I'm die cutting this, it won't be seen. Obviously, if this wasn't being cut out, I would use a light pencil guideline and erase.


To add interest, I took some bakers twine in white, separated it into single strands and coloured it with a marker before wrapping around the top layer of card before matting and layering.


The wreath and bow were fixed using dimensionals - double sided foam pads -to give a slightly 3D effect. The addition of a layered sentiment completes the look. I've placed a stamped insert in as well as stamped the envelope. A friend once said how nice it was to receive a card with a decorated envelope, that it ensured, depending on personality it was opened either first or last.

Inside and out

Sunday, 31 July 2016

Circle of Spring

So today I decided to set myself a challenge. I bought Circle of Spring and the corresponding die set, Wonderful Wreath Framelits as part of my starter set. My lovely mentor and mama duck, Susan, gave me the Wonderful Wreath stamp set so today is the day I get to play. I've been wanting to experiment since they arrived but a temporary work contract and visit to see my daughters conspired against me.


I can see these two sets being used a great deal, there are some fabulous ideas on Pinterest. So many ideas, so little time.

First of all I decided to start with the Spring set. I stamped and heat embossed using white onto vellum before using the marker pens to colour from behind to give a very delicate image and then die cut it out.


At this stage I still only had a rough idea of how I wanted the finished card to look but I do tend to "wing it" with most of my designs.


Well, I appear to have departed from the look I was going for; I wanted the circlet to stand out a little. I chose Calypso Coral and Pear Pizzazz, colours I'd used from the subtle markers. Being very new to Stampin' Up, although I have all the card stock colours, I haven't yet bought any patterned papers, so to tie the colours together I used the small flower stamps and created my own to co-ordinate.


Now to put the elements together.....


Still contemplating a butterfly. Watch this space. ;)

Saturday, 30 July 2016

Abigail's Birthday Card


It was my daughters birthday last week, so what better excuse than to take myself off to the craft room. Abby's friends and fiance call her A-bee, so I had an obvious starting point! I decided to use the Flower Shop stamp set and Pansy punch along with Hexagon Hive thinlets dies - now sadly discontinued. So Saffron, Bermuda Bay and Melon Mambo cardstock proved to be a great match for the 2 patterned papers I found amongst my stash.


Of course it wouldn't have been complete without a bee and the Shooting Stars bundle has 2 really cute bees - both stamps and dies.  It also has a hive so I know what my next card for her will have on it.  Talk about getting ahead of myself!

Shooting Stars