Saturday, 17 March 2018

Baby, it's A Little Wild!

So now we're on to card number two from the boxed set. If you'd like to see the first card, it's in the previous post. This time I made a card for a new baby; I don't know about you, but I find I need lots of these...
                 ...and wedding cards. So many of the girls I used to work with are settling down, marrying and starting families.


Stampin' Up! do a fabulous bundle called A Little Wild. I adore this set for babies and children. The dies make double sided tags but with a small adjustment, you can use the front and back of each animal on a card as I have. I chose to keep it gender neutral by not using pink or baby blue.


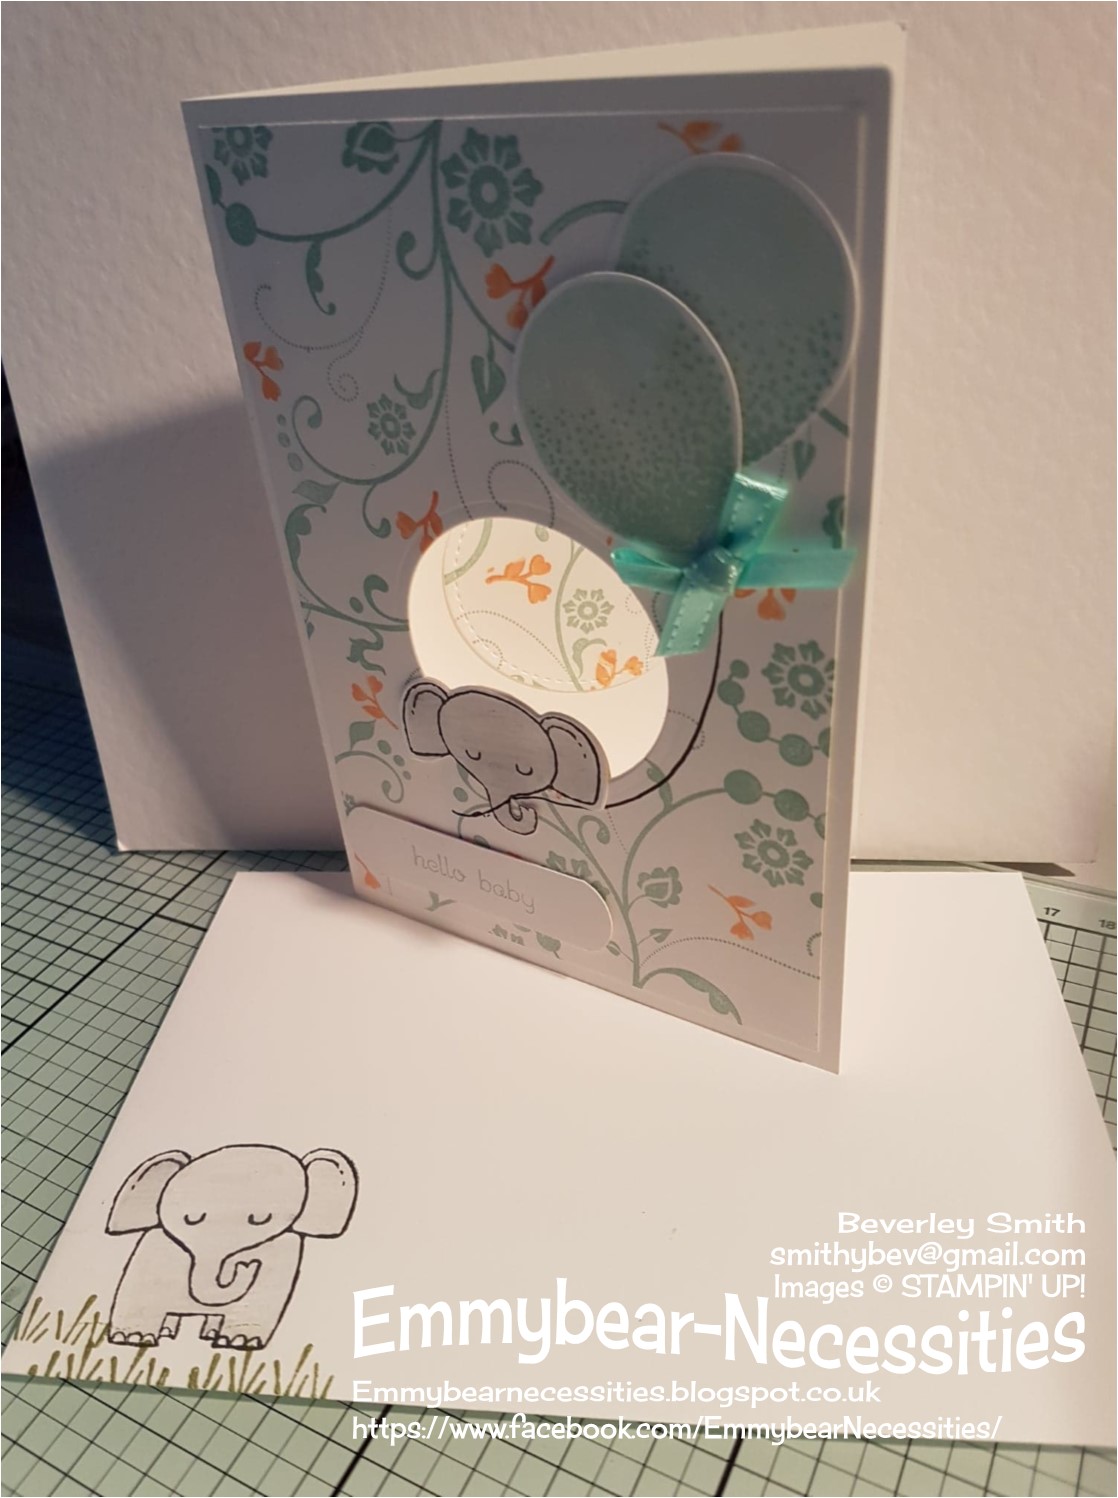
Once again I used a Whisper White base card. I then took more white card stock and using a retired stamp set called Flowering Flourishes made my own DSP using Pool Party ink. Any spaces were filled using a small stamp and Daffodil Delight which came out much brighter than I'd expected. This was adhered to the base card, leaving a small plain white border. I then cut a circle through both layers.


The patterned circle was then stuck down to the inside of the card lining up to  the hole in the front. Using a piece of Whisper White card I stamped, coloured and die cut the elephant. It was then trimmed to remove the loop. Only the head was needed from the front image so that it gave the impression of peeking through.


The back of the elephant was stuck inside the card carefully matching it up to the head. A little grass was stamped around his feet to "ground" him.


I used both first and second generation stamping to make the balloons which were then punched out. They were stuck down using dimensionals. The string was stamped and a bow secured to cover where string and balloons met - there was a very tiny mis-match. All that it needed was a simple sentiment adding. I chose to place it bottom left to balance out the balloons.


I didn't need to add more decoration inside but as usual, I stamped on the envelope for a cohesive look.


Tuesday, 13 March 2018

Jar of Love meets Delightful Daisy

Hello, I've finally made it into my craft room. End of term just can't come soon enough, while I love my job in college, it really doesn't leave me as much time as I'd like to be creative now that I'm full-time.

A while ago I made a book box and filled it with cards as a little thank you to a work colleague who sometimes gives me a lift home. She lives in the same village as me luckily and I have to say I really appreciate her kindness, especially at the end of a hectic day.


Today I'm going to show the first of the cards I made. I based them all on the colour palette of the Delightful Daisy Designer Series Paper although I did use various stamp and die sets for a range of cards that hopefully cover most life events.


For this card I went back to one of my favourite stamp sets, Jar of Love. I chose to use a Whisper White card base for this birthday card. My DSP was cut smaller and using a collar fold mounted onto Calypso Coral. I really like collar folds as it shows off both sides of the DSP. This in turn was stuck onto the front of the base card.


Using a scrap of Whisper White card and the Pool Party ink pad I stamped the small jar and mounted onto the card to the left hand side. I don't know about you, but I love stamping and die cutting leaves, flowers and butterflies so that I can use up the smallest scraps of card stock. I hate throwing any away and if it's big enough to take a die or punch then I put it it in my scrap folder for later use. I arranged the flowers and stuck down using dimensionals once happy with the layout


A small bow using Pool Party ribbon and birthday sentiment taken from the Cake Soiree stamp set completed the look. As usual I decorated the inside of the card and the envelope, this time by adhering a strip of the DSP along one side.


So, this is card number one, I hope you like it. Keep an eye out for the other four cards and the book box I made for them to go in.


Saturday, 10 March 2018

Just a Note with Colorful Seasons

Hello, hopefully this post will finally make it into print; I originally forgot to take photos and had given this set as a little thank you gift. Luckily the recipient brought the set into work enabling me to get a couple of photos, so a huge thank you Danusia.
I then went to add the final photo...
...and lost all of the text. C'est la vie! 

Those of you who take the time to read my blog will know I have a penchant for 3"x3" cards and boxes to keep them in. They really do make lovely little gifts for people. For this set I used the 2016 - 2018 In Colours.


My design was inspired by note size cards I'd made at a Coffee and Cards session with Susan aka Craftyduckydoodah. using Colourful Seasons. This set is fabu;ous as it really does do what it says on the box and cover each season. If you can only get one stamp set, this is the one and if you buy it as a bundle with the corresponding dies you makine a saving of 10%.We all love a bargain.


 I just thought that with some tweaking here and there the design would fit perfectly onto a small square card base.


I used a white card base and matted and layered in both my chosen colour, Whisper White and vellum. I cut the Whisper White and vellum using the largest square from the Stitched Shape framelits. I stamped the leaf and outline onto the vellum which gives a slightly softer look as well as Whisper White which was die cut. The skeleton leaf was die cut from Dazzling Diamonds Glimmer paper. I chose to stamp my sentiment directly onto the Whisper White. The vellum was attached to the card beneath the arrangement of leaves so the adhesive didn't show through. Loops of silver thread were secured behind too.


The pizza style box was based on my previous box, though the sides were stuck down slightly differently. As ever, I worked it out as I went along so have no instructions, sorry. For the decoration I added more leaves and finished it with a small bow.


Saturday, 3 March 2018

Flying Home

Hello, as soon as I saw the Flying Home stamp set I knew it would soon be winging it's way to me. It's taken a little while to get round to inking it up but I just love the results with my first card; perfect to send to someone that has just moved into their new home. In fact I think I might already have a recipient within the next few weeks, all being well. I also thought mamma bird feeding her chicks in the nest could make a great card to celebrate the birth of a baby!


Although my card base is Whisper White, I chose to use Soft Sky to create a border. I partially die cut a circle, completing the cutting around the nest with scissors. I love this effect; it can be a little time consuming to get it right but really is quite easy.


I used a combination of Stampin' Up watercolour pencils and ink pads in conjunction with a blender pen to spread the colour.


I used dimensionals to create a 3D effect and placed some linen thread behind the sentiment which is from the At Home with You stamp set.


Saturday, 24 February 2018

Why do I always leave it to the last minute?

Hello again, by the time you read this, the recipient of this card will already have had his birthday. Goodness, how time flies, my son will be 28 the day before Valentines Day. Seems like just a few short years ago that he was so eager to enter the world at 10 weeks early! If only I'd been able to see into the future to know he wouldn't have had the issues expected and that he'd grow into a strong, tall young man.

Anyway, Adam is a tyre fitter, working at a garage in the next village. When he isn't working he still tinkers on friends cars but I guess it keeps him out of mischief. It was with this in mind that I thought I'd try my hand at my first stepper card. I know there are dies out there but honestly, save yourself the expense; they are so easy to make using a paper trimmer and scoring board.


I had seen a fabulous card by Lisa Ann Bernard on Pinterest that was perfect. Click on her name to go to her blog post. Adam, like many mechanics, has a large red upright toolbox that takes up a considerable amount of shed space. I remember it being at the top of his wish list for a long time until he was able to acquire one. So, it was obvious the stepper card would replicate that in some way.


I was able to create tyres by diecutting a circle in black and then using a round button die - not a Stampin Up one - cut in silver foil for the hub cap. Ok, it isn't perfect but it does show that necessity is the mother of invention! It also saved me a little money as I didn't need to buy any extra dies. I don't know about you but I love it when I can find other uses for my crafty stash. I added some small tools and a creeper board, made from the hardwood stamp on a piece of crumb cake card stock. I also wrote Happy Birthday on a "drawer" front with a silver pen to like like it had been scratched onto the chest of drawers.


Sunday, 18 February 2018

Coffee Cafe with a Sweet Cupcake

Hello, a while ago I made a birthday card for a colleague at work. I find designing something for a man quite difficult normally, but Phil loves his coffee...
                                ...and cake when there is some.


I'm so pleased I succumbed and bought Coffee Cafe; it originally wasn't on my wish list but having seen some fabulous makes by other crafters, I thought I ought to get it. If you have read some of my previous blog posts you may have picked up that I only buy stamp sets and dies if I can easily design at least 5 different cards. I like to make my stock earn it's keep.


I already had the Sweet Cupcake bundle; it teams up with the coffee cup so well. I knew that I wanted to use Crumb Cake so set about going through my stock of DSP for some that would be suitable. It wasn't long before I stumbled across Serene Scenery, the colours were perfect; Crumb Cake and Island Indigo. This DSP is sadly discontinued. I really should have bought more when I could, I love it.


Oops, the darker DSP is from Blooms and Bliss, another discontinued pack. Sorry!


Sunday, 11 February 2018

Flower Shop again??

Hello, if you saw my last post, you'll recall I woke during the night with an idea for a card. Well once I started, I had ideas flooding in from goodness knows where using the same stamp set! This is the second card, again using soft pink and white.


First of all I took my Pink Pirouette inkpad and stamped one of the flowers from Flower Shop over Whisper White card trimmed a little smaller than the card base, leaving the centre clear. I made sure to leave enough space so that I could add small flowers from Petite Petals for a little variation. When creating your own background paper, I think it looks more natural if some of the stamping is off the edge of the card as you can see below.


Next I die cut a circle from it before mounting onto a slightly larger piece of Pink Pirouette. The die cut circle was then die cut again using a slightly smaller Stitched Shape Framelit circle and them stamped with the sentiment. I love that the pink background forms an edge around it to make it pop more.


I stamped and punched one larger and two smaller flowers alongside some leaves, arranging them to the lower right of the sentiment. Once again, I stamped inside the card and on the envelope for a cohesive look. Another quick and easy card, I hope you like it.