Saturday, 31 December 2016

Happy New Year

Hello, as we approach the end of 2016, a brand new year full of possibilities is about to start, I don't know about you, but I always associate fireworks with 1st of January and I have a couple of seemingly unlikely stamp sets that will give a lovely effect.

The first one is my Xmas favourite, Star of Light and the other is the small round stamp from Balloon Celebrations. I did this technique on a first birthday card. The brief was "fireworks" as the little girl arrived on the 5th November. Unfortunately, I didn't take a photo of the finished card.

The ink technique I want to show you is called Joseph's Coat. First of all I "splodged" random blocks of colour onto white card using my inkpads and sponge daubers. The next step is to stamp an image using Versamark, then heat emboss it using clear gloss embossing powder.

Splodging - a great technical term - ink over the paper and embossing
powder on a Versamak stamped image

Once heated it (obviously) goes clear. I hope you can see it on the picture below. At this stage I tend to go very carefully, stamping and embossing a little at a time, repeating as required to build up the image as I find it quite difficult to see.

Once heated the embossing powder melts to a clear finish

For the next stage you really need to be quite brave and not mind inky fingers! Certainly not a task to undertake prior to attending an important event.


This works best with a dark ink sponged over the entire paper quite liberally. All of the colours need covering well. Again it's best to keep going over the paper, building up the colour bit by bit. It can take a while to complete, particularly if you have used bright colours.

The final step to this technique is to take a piece of kitchen roll and buff the paper. The dark ink doesn't adhere to the embossed images leaving splashes of colour behind, all ready to use on a card base.


Tuesday, 27 December 2016

Merry Christmouse to one and all

Hello, it's Christmas Day and while I'm waiting for lunch to cook I thought I'd have a little play with the Merry Mice stamp set. My son pointed out that if they were real mice, I'd run a mile, which is probably quite true. These are so cute that I can't choose a favourite.


This set is from the Autumn/Winter catalogue and will be discontinued on 3rd January. At the moment it's still available and has been reduced in price, so if you want it and at a bargain price, please be quick as you only have a few days to place your order.


I chose to use a pastel palette, inspiration taken from the colours of the Fancy Frost Sequins, certainly not the usual colour choice for Christmas.


First of all I stamped the image onto watercolour paper and coloured the mouse in using the inkpads and a blender pen. For the sky, I used Soft Sky, Tempting Turquoise and Night of Navy, this time using an Aqua Painter to get a soft wash. Tip Top Taupe completed the ground.

I then chose an oval die to cut out the mouse and mounted it onto a slightly larger oval in Sweet Sugarplum from the latest In colour range.


 Once again the Softly Falling embossing folder came into use - perfect for this time of year. The Merry Christmouse sentiment was stamped directly onto the white card before it was mounted onto the base card. After I'd added the ovals it struck me that a die cut star wouldn't look out of place. It also balances the sentiment.


One of the Starlight Thinlit dies was cut from White Glimmer paper for added sparkle. I think you can just about see the sparkle on the photo. And finally the card was completed with the addition of some sequins for a little bling. Louise, who I see at Coffee and Cards sessions would be proud of me! She loves to add bling to her cards, you can never have too much apparently.


 As always, a little decoration inside the card and on the envelope to make it stand out from the crowd


Friday, 23 December 2016

How many Xmas cards do I need??

Hello, thanks for stopping by. I can't believe on Christmas Eve I'm still making cards for the holiday season. I am really enjoying making them so I've started on my stash for 2017; how's that for forward planning? No getting caught off guard this next year for me.

This time I'm sharing a shaker card. Susan of Craftyduckydoodah showed me this easy way of making them at one of her Coffee and Card sessions. I've used mainly SU products although I confess the church stamp is one I've had for several years and is not made by Stampin Up. I chose Night of Navy and White with silver accents for a fresh look.


 I've used dies from several sets to create the bauble card so my shopping list might seem excessive this time. Those of you that know me, are aware I like to get value for money so this time, in my defence, I was trying to think outside the box. The bauble is actually just a round die with the top taken from the Delicate Ornament Thinlits. The bow is from Everyday Jar Thinlit dies although I could have used the bow as well as the sentiment fromWonderful Wreath Framelits. The Softly Falling embossing folder added some texture and just made the whole scene feel a little more Wintry


The band of Silver Glimmer Paper and die cut sentiment complete the look. Please look out for other cards based on the bauble theme; I intend to make a variety of them.


Sunday, 18 December 2016

Men Going Global

Hello, do you find it more difficult to make cards for men? I certainly do! I'm lucky in that when I first discovered SU through a Coffee and Cards group, the stamp set used that afternoon was Going Global; it was one of the first SU stamp sets I ever bought and seems such a long time ago now.


I chose to use light colours and Pool Party and Crumb Cake seemed to tick the right boxes. I teamed them up with some balsa wood, bought from my local model shop. I know that might appear to be an odd choice, but using a thin gauge balsa definitely adds to the effect and it can be coloured using the inkpads and a sponge or dauber. It cuts very easily and can even go through the Big Shot too.

I decided to use the compass from the set as the feature whilst by using the same colour ink as cardstock, the Ursa Major constellation formed a quite subtle background.


I didn't want a "fussy" card so put a band of Mint Macaron ribbon around and then wound some Linen Thread around my fingers before placing behind the compass. To complete the look I used a simple sentiment and 3 Perfect Accents, strategically placed. Did you know that the White Perfect Accents can be coloured using Promarkers? This makes them so handy to keep in stock!


Sunday, 11 December 2016

From Circles to Baubles

Hello again, Christmas is rapidly approaching isn't it. I hope preparations are well in hand, unlike mine this year. Its going to be a last minute rush again. Will I never learn.

The card I'm sharing today is made to look like a bauble, using a circle I confess, the image I coloured in is not SU, it's by Penny Black - and so like my cat, Star. I haven't put the tree up this year as she has a habit of climbing up curtains, plants etc. I can imagine I'd come home to a real Star on top of the tree each evening.


I'm not going to write a set of instructions today. There are many tutorials on You Tube for shaker cards that can be followed and indeed, several different ways of making them. I love this style of card, they look more complicated than they actually are but one piece of advice I will give is add the flakes before sealing...
 ...I'm sure you can guess what I've done in the past.!


Sunday, 4 December 2016

From the Herd for a Little Monkey

Hello, goodness hasn't this year just flown by. It seems like it was only yesterday that I was anticipating the arrival of my first grandchild, yet now I'm making her first birthday card! Emily arrived on the 7th Dec, her mum, my eldest daughter Abigail, delivered her on her own whilst her partner was downstairs watching football. I'm sure it wasn't planned that way, but you know how the best laid plans can go awry!


As soon as I saw a retired stamp set called From the Herd, I knew I had to get it. I'm not sure what it is about this set but I love it... and it can still be found on various selling sites. I have the Hardwood background stamp that goes perfectly with this set

At this point I must thank Connie Lindsey as I CASE'd her design that I found on Pinterest, tweaking it just a little to suit. Cutting out the animals is a little fiddly but well worth it in the end. I did try to isolate each animal in turn to stamp directly onto the card, however it became obvious that it would take me far longer to complete; I will need to brush up on my skills in the future.


Friday, 25 November 2016

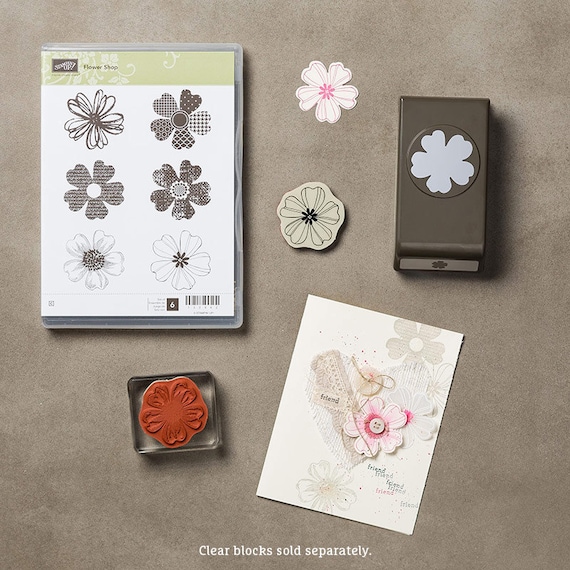
Flower Shop


Hello, my list of cards I want to make is still rapidly growing but I thought I'd have a go at one quick one today. This was inspired by an art lesson at work where the students were using a wax resist technique. They had a great time using oil pastels to make an Xmas tree before putting a watercolour wash over it all. The results were stunning.

It got me thinking about how I could not actually recreate it, but get a similar effect using different media. I decided that the Flower Shop stamp set would be perfect to stamp and heat emboss with. I started by taking a piece of watercolour cardstock and stamped one of the flowers over the paper using Versamark. I then heat embossed with white emboss powder before using some of my favourite colours to produce a graduated colour wash. It had to dry thoroughly and if I'm honest, I wanted to use a heat gun to quicken the process but managed to resist and use the time for a little clearing up.

Stampin Up Flower Shop Cling mount bundle


Once dry it was mounted onto a piece of Perfect Plum card stock, then onto Whisper White before mounting onto a Pefect Plum base. A simple sentiment completed the design alongside a punched flower.


Friday, 18 November 2016

The Best Tool Ever...

Hello, I'm still working on wedding stationery so although I've lots of ideas for cards and am desperate to get cracking on them, there just don't seem to be enough hours in the day.

The one upside is that I decided to invest in a new tool to help with my stamping. Since I need to stamp in the same place on each invitation, RSVP etc I chose to buy a stamping press.


It's amazing...
...stamping was never my forte, it's always been a bit hit and miss but so far with this tool I've got some great results. This really is the best thing I've found since discovering Stampin' Up.

It has a ruler in both inches and centimetres along 2 sides so although the press is 7" square, you can use larger sheets of paper and card. The hinge self adjusts according to the thickness of the stamp being used and the base of the press has a grid which helps to keep cardstock in place.


Friday, 4 November 2016

Where's Rudolph?

Hello, I've been rather tardy about putting up recent makes. To be quite honest, there haven't really been many makes as I'm still part way through a Wedding stationery order.

Anyway, the other week at Coffee and Cards we made a great little Christmas card using the reindeer stamp from the Cookie Cutter bundle with a hat and scarf to keep him warm from Jolly Friends.

Susan had originally designed it in shades of brown to make suitable for a man. I don't know about you, but I find it quite difficult to come up with male oriented cards at times. When she showed me the card I instantly thought I'd like to make it in Blushing Bride, a lovely delicate pink, for my grandaughter who will have just turned one in December.


We used the Cable Knit Dynamic Textured Impressions Embossing Folder which gives a deeper and more detailed design. The cable pattern fitted so well with the theme that I couldn't resist using it on the envelope too.


Friday, 21 October 2016

Star of Light at Coffee and Cards


Although I know I should, I haven't yet had opportunity to buy from the Autumn/Winter catalogue so when Susan of Craftyduckydoodah suggested we use Star of Light, I jumped at the chance. In fact we were lucky enough to use this set two weeks running and make completely different cards.


The first week we used Sweet Sugarplum and Very Vanilla, possibly not really thought of as Christmas colours, but the results were gorgeous.


As usual I added a little bling - well you have to for Christmas! The smaller star was die cut from Dazzling Diamonds Glimmer paper. A Wink of Stella in clear alongside a few jewels completed the look.

As usual we decorated the inside of the card and the envelope. I think it gives a "finished" look each time. This set is on one of my wish lists - yes, I have more than one! List one is for must haves - the sets I just can't live without. Sets and/or bundles that I know I will go to for numerous occasions, regarless of whether they get discontinued. Star of Light (and Jar of Love) fall into this category. The next list is the wanted list - sets that I know will be used but may not have such versatility.

The swirly stars are perfect for backgrounds throughout the year. I've been eying them up for the next Harry Potter card I make for my youngest daughter but more about that later.


And so onto week two. This time we made a shaker card in Night of Navy and Whisper White. They look as if they are quite complicated to make but really are so easy....


This time the star was cut using the plain die. The cutout was stamped and very carefully stuck onto the base card so it fitted the aperture. It's at this stage it helps to remember the acetate to hold the sequins in. It can be either glued or taped in place as long as there are no gaps for the sequins to escape, Stampin' Up now make foam adhesive strips which are a great depth and will mould around any shape.


Close up


Once again Wink of Stella added bling, this time to the swirls. Sorry it doesn't show up so well on the page. To make the shaker more interesting the star was stamped inside before adding sequins.

Is this where I admit there are actually more of the little stars on this card than I had intended? I'd just inked up the slightly larger of the 2 small stars when it fell put of my hand onto the paper, ink side down. Bit of an oops moment however by adding two more - one small and another larger, I think I've got away with it. And who knows, if I hadn't 'fessed up, no-one would be any the wiser.


Friday, 14 October 2016

Pleats, Folds and More Pleats

Hello, this last week week I've been looking at ways to use DSP in my cards. I came across the idea of pleating it to create different effects and have to say, I really like the results.

For my first one I used 2 sheets of 6"x6" paper as I didn't have any 12" double sided. This really caused me headache trying to get the join hidden and I honestly wouldn't recommend it unless you have paper that you just can't not use.


As the paper has such a busy pattern I tried to keep the decoration to a minimal, with just a sentiment and one butterfly. I love butterflies, so the end result, for me, justifies the headache caused matching the paper. The DSP used is the sadly retired Pretty Petals and the butterfly was stamped from Papillon Potpourri and punched with the matching Elegant Butterfly punch.


The next card I made was far easier courtesy of Susan  from Craftyduckydoodah who on hearing my plight kindly sorted through her 12"x12" DSP stock and brought some sheets for me to use when I attended her Coffee and Card group.


This time, the pleats weren't so close so more of the 2nd side could be seen. With the words facing, I thought it would be nice to add balloons.I didn't have any wide ribbon in either white or Night of Navy so used narrow navy on a strip of Whisper White cardstock. Balloons were punched from Whisper White, Night of Navy and the DSP.


So flushed with success I thought I'd try a collar fold for the third card. I combined  a sheet from Pretty Petals with my favourite bundle, Jar of Love to create this one. I think it might even be my favourite card of this group.


At the time of making this, a friend let me know that her son had been involved in an accident and was undergoing emergency surgery, hence the sentiment. Thankfully, he's making a good recovery and due to the skill of the maxillofacial surgeon will have minimal scarring.


And finally, getting right into folding, I chose to make a double pleated card. This one used Affectionately Yours DSP. I also used a Swirly Scribbles die and the tiny flowers from the Jar of Love bundle - could it have really been anything else!


I really hope you like this selection. Next on my to do list is to try a different for me ink technique. I'm going to attempt to recreate the Northern Lights and will report back once it's completed. I expect to have very inky fingers.

Friday, 7 October 2016

Bella and Friends

The other day I made a card for a friends niece for her first birthday. I used a fabulous stamp set set by Penny Black called Zoophabet and stamped the tots name. Anyway, I really enjoyed doing the water colouring so that led me to dig out Bella and Friends. The dog is just like my daughter's dog, Dexter.


I love the colour Pool Party so decided that would be my starting point. Ages ago I bought some sheets of thin balsa wood and felt that would complement the blue perfectly, alongside a little silver for a bit of zing. I used blender pens with Write Markers to colour the image in. A little Kraft Rope trim unravelled and wrapped around the top just finished it off.


Tuesday, 4 October 2016

Falling for.... Fall

A Coffee and Cards treat again. Now there is a chill in the air early morning and night time, thoughts turn to winter woollies, snuggling up in front of the fire, hot cocoa and crumpets, well mine do anyway. I love this time of year for the autumn leaves, the colours are so rich and combined looked stunning so I was delighted when it was suggested we made an Autumnal card.

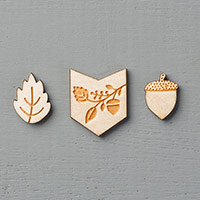
Susan gave us a couple of options of design using the Vintage Leaves stamp set. She also incorporated the most gorgeous little Into the Woods embellishments and we were each able to choose the one we wanted. In fact I love them so much, they have been ordered for me today.
Into the Woods Elements by Stampin' Up!
Rather than me explain how we made the cards, I'll post the link to Susans blog so you can see for yourself. For me, the main difference is that I used the embossed rather than debossed side. While some demonstrators prefer you to slavishly copy, we are encouraged to go "off piste" and alter the design to suit which follows the Stampin' Up ethos "Inspire, Create, Share"

https://craftyduckydoodah.blogspot.co.uk/2016/10/stampin-up-vintage-leaves-version-1.html


Saturday, 24 September 2016

All quiet on the Eastern Front

Just because I haven't posted any new cards doesn't mean I haven't been busy! A while ago a former work colleague and her lovely fiance came to ask if I would design and make their wedding stationery. Up to this point I'd only made the odd card for special occasions for her so my first thoughts were panic and fear. What if they didn't like my ideas? Worse still what if I didn't have any ideas? But with that came an excitement that someone trusted me with an important part of their special day, well in this case weekend!

Whilst it is a small wedding, it's unusual in that it will be held in Wales, a place that's special to the bride and groom - who both live in East Anglia - and events are planned for the whole weekend. And so after much discussion it was decided that a folder would be the way to go, with pocket on one side to hold information such as travel directions, accommodation, menus etc and the invitation on the other. Chantelle had seen a similar folder I'd created to hold notelets and envelopes which she felt if scaled up would work quite well. The idea being that guests would only need to take one item with all the relevant information on instead of several pieces of card.

After much discussion the happy couple decided on an image for the invitation, one that will look beautiful once stamped and water coloured. We were rather lucky that Stampin Up had recently brought out a beautiful stamp and die set that is so perfect for weddings and it was decided to incorporate them into the design.

Obviously I'd love to be able to show the work so far....

...unfortunately as this is still a work in progress I can't 
reveal any of the details. My lips are sealed. What I can say, is that over the coming weeks I will be chained to both the computer and die cutting machine so please bear with me for the lack of posts. Also once the invitation folders have been sent out, I will be posting them on here subject to permission from my clients.

Saturday, 17 September 2016

I'm in love... with the Jar of Love bundle

My order containing the Jar of Love bundle arrived yesterday and I've been dying to use it. It's funny how with some sets, I have so many ideas I don't know what to make first. At times like these I put pencil to paper and make a very rough sketch so that I don't forget. Also many of my cards evolve as I'm working, whereas this one I had a very clear image right from the start. It's loosely based on the card I made at Cards and Coffee with Susan at the Grand Piano in Godmanchester, Cambs.

Having got in the mood for Xmas at this weeks Cards and Coffee, I thought I'd make another card for the holiday season, although it has been sugested it would be suitable for Anzac Day with the right sentiment. I don't know about you, but I still associate Christmas with rich, warm colours and these just fit the bill.


I used Wild Wasabi and die cut the largest "round" shape from Swirly Scribbles Thinits as my wreath. I love using the linen thread and this time wrapped it round my fingers a few times before then securing it to the wreath along with some leaves and stems stamped in Garden Green and die cut.

Now last week I really struggled with the 2 stage stamping. I got some scrap paper and had a practise; it's actually quite easy once you get going. The set also has some really small flowers, probably my favourites out the sets I currently own, so I had to include a few. A sentiment added onto the banner and the card was almost complete. The second part of the sentiment was stamped onto cardstock and stuck inside to complete the look. I hope you enjoy it.


Inside


Wednesday, 14 September 2016

One Set... how many ways part 2

Balloon Celebrations

Ok, I hold my hands up. I did say the remaining 2 cards would be on the next post. I'd also hoped that it wouldn't have taken me quite so long to put them on here, but as usual life got in the way so I apologise for the wait.

Day 4 we go back to the balloons. This time I used white card stock. I blended two colours together before punching out the shape. I love how the balloons are really vibrant against the white background; I think this is my favourite so far. The colour combinations are Tempting Turquoise and Pear Pizzazz, Daffodil Delight with Tangerine Tango and finally, Melon Mambo blending into Calypso Coral.


Now finally onto day 5. Have you seen the little round stamp with lines through it? At first I thought it looked like a bicycle wheel but then it suddenly struck me. Using Tangerine Tango, Daffodil Delight and Pear Pizzazz I have slices of orange, lemon and lime! Once again I haven't put a sentiment on, I find it much better to wait until the card is going to be used so that I can get just the right one.


It almost feels as if I should have a jug of Sangria on the table next to me...

I hope that this will show how versatile this set is; there are so many ideas rattling in my head that it's a case of picking one. I could go on for at least another week. Apart from sentiment stamps and a cloud die set, I really have only used the bundle I set out to. Background papers have been made by either using the small stamps in the set or blending inks together. I had been saying to Susan, my upline at SU that I was finding it quite difficult as I had a limited stock having only joined in July. This has proved to me that you don't need a massive amount to start with - obviously I have a wish list a mile long which is slowly falling into my craft room - but with a little creativity and imagination you can create a variety of cards. And if all else fails, there is always Pinterest to kickstart the idea process. I've really enjoyed this challenge, so much so I'm thinking I will set myself a one sheet wonder target using DSP in the near future. Watch this space...

Wednesday, 7 September 2016

Cards and Coffee.... and a card or two

It's always nice to meet up with like minded people and spend a couple of hours eating cake, drinking coffee and of course, creating something beautiful. Yesterday I went to a Coffee and Card session hosted by Susan at the Grand Piano in Godmanchester. I highly recommend Susan's groups; lot's of chat and fun is had by all and she takes time to demonstrate new to us techniques whilst giving plenty of encouragement. I have to confess that yesterday I just couldn't get my eyes working well enough for the 2 stage stamping so ended up using some items already stamped. I've ordered the set used and know with practice I'll get the hang of it quite quickly.

Susan's design, Gorgeous isn't it?

The great thing about crafting with others is that we all have slightly different ideas on the theme and while it's accepted to copy - CASE - a project Susan has created for us, we're also encouraged to go "off piste" and run with our own ideas. The inspiration for this card was Jar of Love. We also used a Swirly Scribbles Thinlit die for the wreath. No two cards were exactly the same, I even chose to use slightly different colours on mine and also liked the idea of putting the sentiment onto a banner as you can see.

...and my version


I'm really looking forward to the next session, can't wait to see what we'll be creating next. If you'd like to create a card like this, pop along to Susan's blog for a list of items used.

Monday, 5 September 2016

One set.... how many ways

At the start of this week I decided that I'd take one stamp set, in this case Balloon Celebrations along with the balloon punch and make a different card or papercraft item each day. When I first started with Stampin' Up my lovely upline Susan, also known to me as Mama Duck, said that the best way to choose a stamp set was to have at least five designs in mind to use it on. Let's face it, we all like to get value for money.


So, lets start. For my first project, I'm not using the balloons which would be the obvious choice. The stamp set has 2 tiny stamps that look a little like tiny florets that together could create a dandelion head. It has to be said that when I first saw them, I wasn't too sure how I would use them. Anyway, as usual Pinterest came to the rescue and I've taken ideas from 3 sources and combined to make my own design. I created a background using Soft Sky, Marina Mist,  Dapper Denim and a little Night of Navy. A quick spritz with water and ink and once dried it was ready to stamp onto. To make the dandelion I practised a few times on scrap paper, trying out different styles until I was happy with the look. I certainly didn't want to mess up at this stage after the time it took blending the background. A dash of Wink of Stella on the stamped images and a few gems for a little understated bling and it was ready to mount onto the card. So here's the finished card.


Day 2 - and much as I like the dandelion theme - there will be more another day - today is the turn of the balloons. I've used the balloons before, the last time for my daughter's 21st birthday in August, so technically I could put that on here. I'm not going to though to prove the versatility! A little watercoloured background and die cut clouds had the balloons flying high in the sky.


Day 3 - and we're back to dandelions. When I came to make this card I realised that I'd used Marina Mist for the previous two. It's funny how we tend to automatically gravitate to certain colours isn't it. Anyway, I made a conscious decision to choose something different. This time I used Pink Pirouette, Pear Pizzazz and Wisteria Wonder; not a shade of blue in sight. I also used a design sketch for my layout from Mojo Monday Sketch Challenge. Layout sketches can be great for kickstarting the flow of ideas and you can get completely different looks from the same layout. This time I used the ink resist technique.


The other 2 designs will be on the next post.